In this geometry nodes tutorial we will look at a general overview of Geo nodes, and what we can do with them.
Afterwards we will look at a few geometry nodes examples to help you get up to speed with getting started with this new system.
What are Geo Nodes?
Geo Nodes, short for Geometry Nodes, are a relatively recent addition to Blender's toolkit. They provide users with a visual and procedural way to manipulate and generate geometry within the software.
In this article we will look at some use cases for geo nodes and then walk you through an example of setting up a basic Geo Node System to create a basic wooden floor with randomized panel colors.
If you are not already familiar with Geometry nodes - we will do an overview, but I also recommend reading this article on what exactly they are.
So what can we do with Geometry Nodes?
In essence, Geo Nodes allow you to create complex shapes, patterns, and animations using a node-based workflow. This means you connect various nodes together to define how your geometry is formed and modified.
Another use case with the 4.0 update was the use of geo-nodes as a “no-code” solution to custom tools with Blender itself. For example, imagine you want a button that create a cube and adds a subdivision to it. You can now achieve this and more with Geo nodes. But more on that later.
Now, for those of you reading this, I would assume you all know blender, but in case you don’t:
Blender is a popular open-source 3D creation software, that is used to make films, games, Architecture and more. It never ceases to amaze me with its innovative features and speedy update lifecycle.
One such feature to be added recently that has caught the attention of the 3D graphics community is "Geo Nodes." Whether you're a seasoned Blender user or just starting out in the world of 3D design, Geo Nodes offer a powerful toolset that can help you create intricate geometric shapes, effects, and animations.
In this article, we'll delve into what Geo Nodes are, how they work, and how you can leverage them to enhance your creative projects.
How Do Geo Nodes Work?
At the heart of Geo Nodes is a system that enables you to manipulate geometry through a network of interconnected nodes. Each node serves a specific purpose, and by combining these nodes, you can achieve intricate results without the need for complex manual modelling.
Node Setup: You begin by creating a "Geometry Nodes" modifier for your object. This modifier acts as the starting point for your procedural geometry generation.
Node Network: Within the modifier, you build a network of nodes. These nodes range from simple primitives (spheres, cubes, etc.) to more advanced operations like transforms, modifiers, and randomization.
Node Connections: Nodes are connected in a logical sequence to define how the geometry, data or logic evolves. For instance, you can start with a basic shape and use various nodes to add noise, displacement, or even animate the geometry over time. We will take a closer look at an example further into this article.
- Parameter Tweaking: Each node comes with adjustable parameters that allow you to fine-tune your geometry's appearance and behavior. This iterative process enables you to achieve the desired outcome.
Applications of Geo Nodes within a workflow
The versatility of Geo Nodes makes them invaluable for a wide range of applications within a workflow including but not limited to:
- Procedural Modelling: Geo Nodes allow you to create intricate structures, such as forests, cities, or abstract designs, by defining rules and patterns in a procedural manner.
- Animation: By animating parameters within the node network, you can create dynamic and evolving animations, saving time compared to traditional keyframe animation.
- Visual Effects: Generate complex visual effects like particle systems, fluid simulations, and dynamic simulations, giving your scenes a realistic touch.
- Generative Art: Geo Nodes open doors to generative art, enabling you to generate unique and aesthetically pleasing designs through algorithmic approaches.
Benefits and Learning Curve
- While Geo Nodes offer immense creative potential, they do come with a learning curve. However, the benefits far outweigh the initial challenges. Some advantages include:
- Efficiency: Quickly generate complex geometry and effects that would otherwise take hours or days to model manually.
- Flexibility: Easily make changes to your designs by tweaking node parameters, without starting from scratch.
- Non-Destructive Workflow: Since Geo Nodes are procedural, you can make changes without permanently altering your base geometry.
What can Geo nodes be used for in Blender?
Procedural Terrain Generation
Geo Nodes excel at generating realistic terrains. Utilize nodes like "Noise," "Voronoi," and "Displace" to create natural-looking landscapes. Combine these nodes to control the distribution of terrain features like mountains, valleys, and rivers.
Procedural Building Generation
Create whole cities with buildings that fit the city layout and conform with one another stylistically. Geo nodes make it much easier to generate vast amounts of buildings that could almost be thought of as being bespoke to our world.
Ecosystem Creation
Building entire ecosystems is possible with Geo Nodes. Simulate forests, fields, or cities by distributing objects across surfaces. Use variations in scale, rotation, and material to create convincing scenes with minimal manual input.
Complex Object Instancing
Duplicate and place objects with precision using Geo Nodes. This is perfect for creating patterns like roof tiles on a building, scales on a dragon, or even stars in a galaxy.
You can get far more control over instancing with Geo nodes over the original methods of either parent/child instancing or modifier/array instancing.
Dynamic Animation
Geo Nodes enable procedural animation. Generate animated effects like waves rolling across a sea, leaves rustling in the wind, or flames dancing realistically. Just be warned that creating such an effect will take a long time and a lot of patience. It isn’t nearly as easy as people make it out to be.
Data transfer + Generation
Don’t feel that geo nodes' only use case is for generating more geometry. I find that one of Geo node’s more useful aspects is the ability to assign values and data to different structures of the mesh - that then in turn, can be accessed in many different ways. For example setting random values on mesh islands that can then be accessed by materials which allow for seemingly random material colors (This is achievable in cycles without Geo nodes - but you need geo nodes to do this in Eevee)
Tool Authoring - (Since 4.0)
It is no secret that if you want to add some custom functionality to blender - you will need to program in Python. Which to be honest isn’t that bad. But I do understand that new people coming into the software space for the first time might find this daunting.
So since Blender 4.0’s release they have included a no-code solution with the help of geo nodes. Now you can Author your own tools and functionality.
A note about new Blender Releases
Since the inception of Blender geometry nodes by the Blender foundation every new update has come with a stack of changes.
So it is important to ensure that you read the latest development blog and the blender manual to be fully up to date.
Geo Nodes Example #1 - Duplicating geometry with offset
Getting Started with Geometry Nodes
To get started with Geo nodes you want to navigate to the geometry nodes workspace.
Workspaces can be found in the top area of blenders UI. It will be denoted by the words “Geometry Nodes”
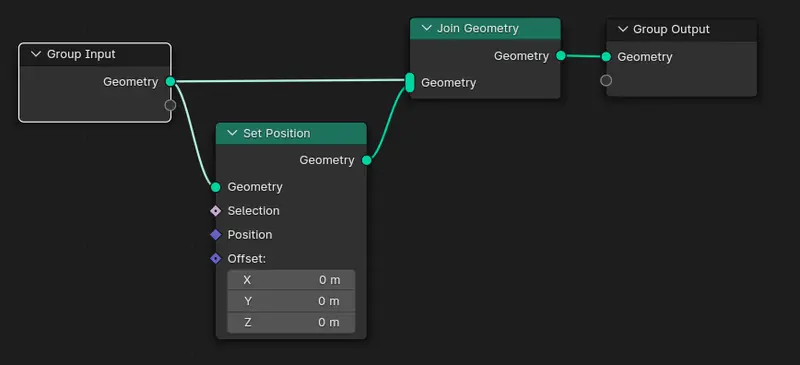
Create a duplicate with Offset
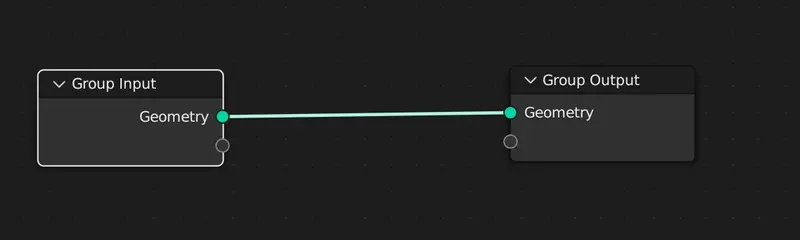
- Take the geometry data and place one wire in Join Geometry
- Take the same geometry output (from the group input) And place it in the geometry input of a set position node
- Take the output of the set position and join it in the join geometry node. What this does is it duplicates the geo data and now we have one geometry data that can be moved around with the “set geometry” node - When paired with the “Join geometry” it duplicates the Geometry and combines them together.
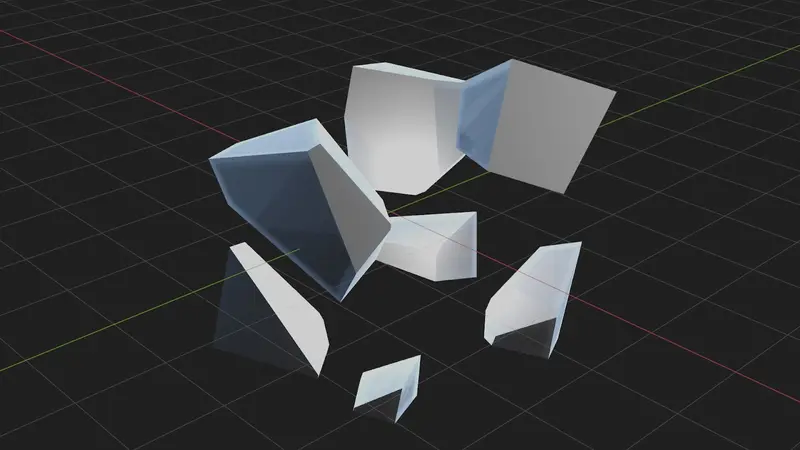
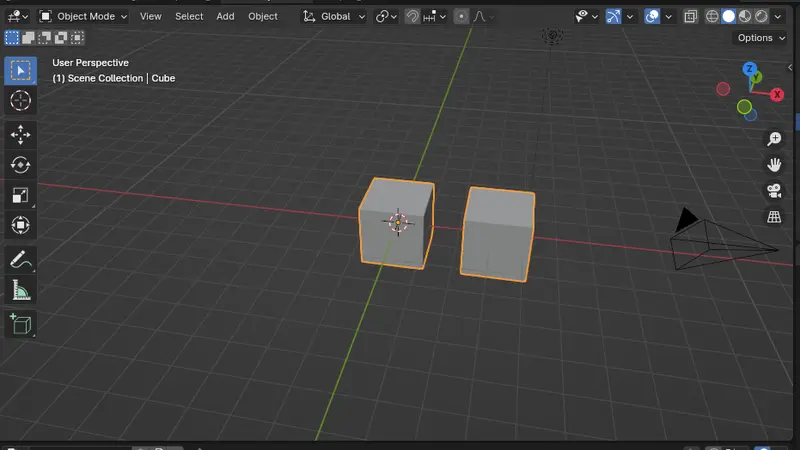
- We can now change the offset values in the set position node to change the local location of the duplicated geometry.
 What you should end up with if you have done everything up to this point.
Geo Nodes Example #2 - Creating a wooden floor
This example will use the knowledge from our previous example to both create the array, and then we will expand upon it by introducing you to the Repeat Zone and how to add custom data to the vertices.
Step 1 - Create a Plank
In Blender create a simple plank in edit mode by scaling a basic cube.
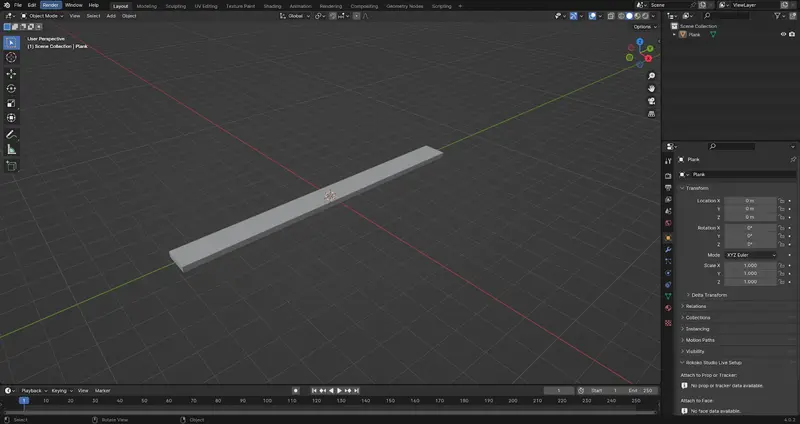
To Scale in edit mode.
- Select your cube.
- Press tab
- then select all points on your cube by pressing ‘A’.
- Then scale by using the scale tool - S + (The axis direction you want to scale in, ‘x’ and ‘z’ in my example.)
Step 2 - Navigate to Geometry Nodes
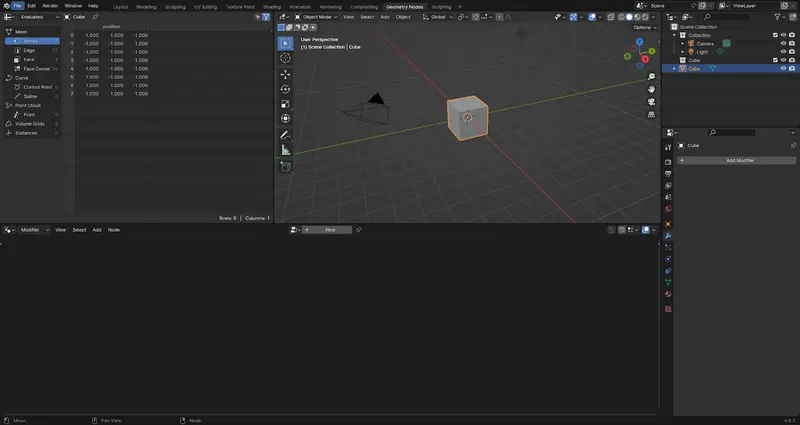
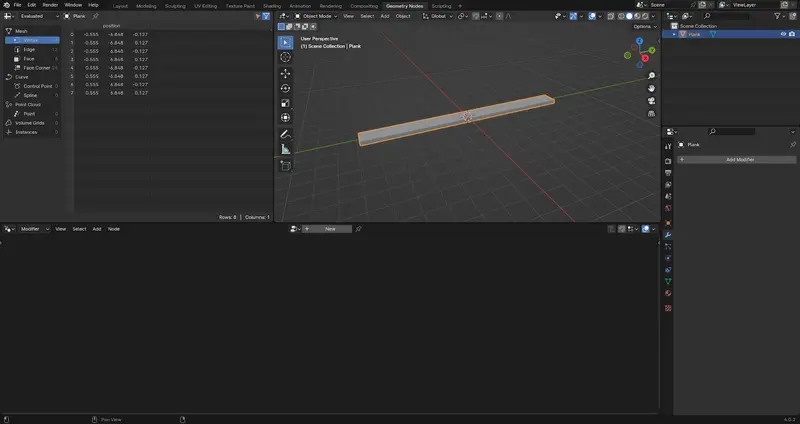 Using the workspace tabs at the area of the top of the screen, access Geometry Nodes workspace. Your workspace should look something like this.
Step 3 - Create a new Geometry Node System
Create a new Geometry Node System by clicking on the "New" button. You should end up with something similar as shown above.
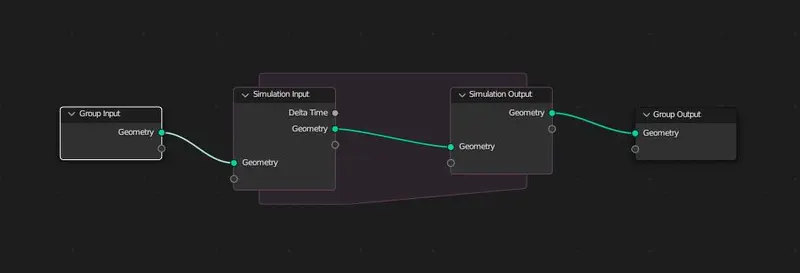
Step 4 - Create a new Repeat Zone and Generate Array
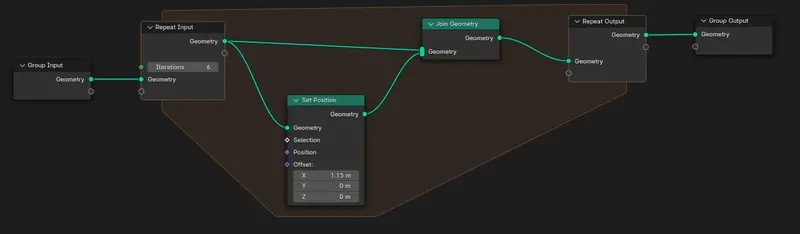 The repeat value will represent the amount of times an object will be instanced and offset (Array).
- From the geo output place one wire into a Set Position - with an offset in the direction of the your planks.
- Then from the same geo output place a wire into a join geometry node
- From the Set Position geometry output, take the wire and place it below the first wire in the join geometry input.
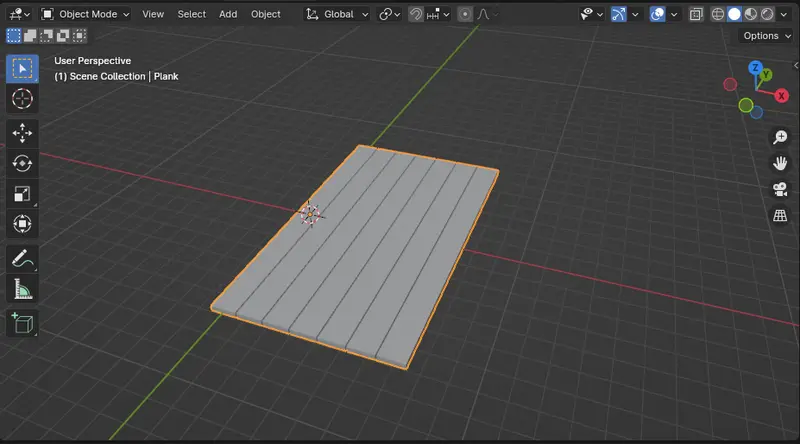
You should have something similar to the picture below now.
Step 5 - Add Data into the Mesh islands
We are now going to set up a system that will allow us to add "random" values to each plank. We do this by assigning a value to the mesh islands - passing it through a random node.
A Mesh island is the individual meshes that make up an object (Meshes that are not connected)
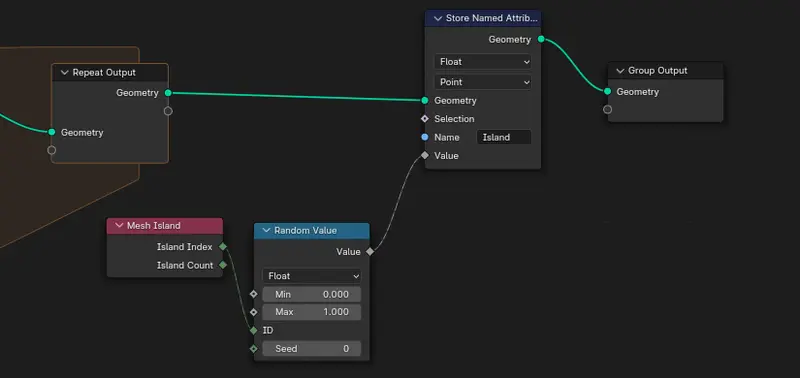
- After your repeat zone - (A node group) denoted by a orange area in Blender 4.0, and between your group output.
- Essentially use a mesh island index going into a ID, and store that value into a Stored Named Attribute.
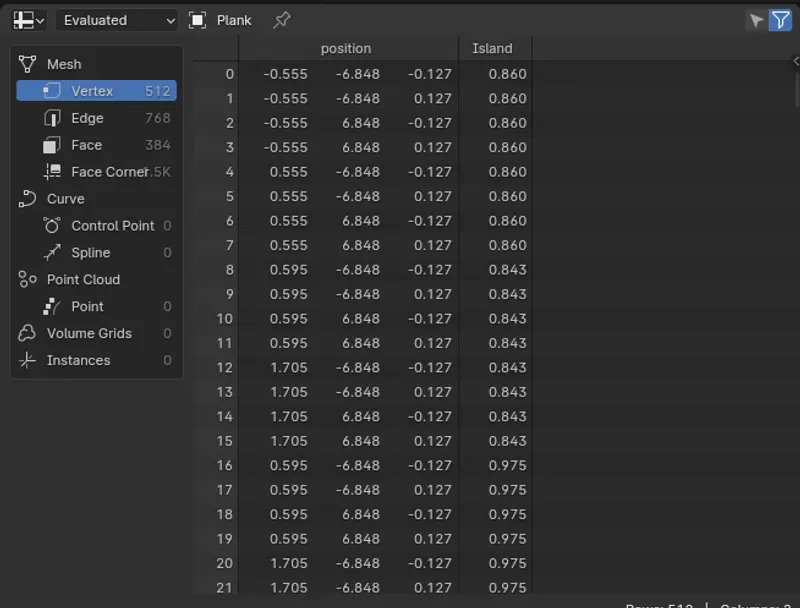
- Name the Attribute something unique. In my example I name it “Island”. (What this is doing is that the geometry node system is affecting the vertex data)
- If we look in the data panel - we should see a new column called the name you used in your Stored Name Attribute node.
Polyfable
Bring your stories to life
Are you tired of scrolling youtube?
Trying to learn how to tell your story?
Become a member and get access to our amazing courses and levels!
Join NowStep 6 - Creating a Material
Now, navigate to the shading tab.
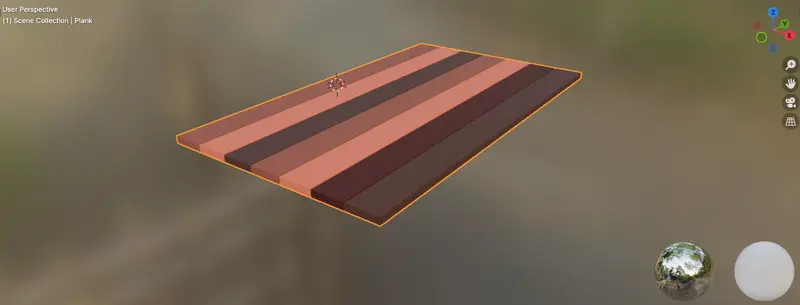
From here we are going to create a simple material that uses the Attribute that we created with the Geo nodes in the last step to randomly shade our planks with different colours.
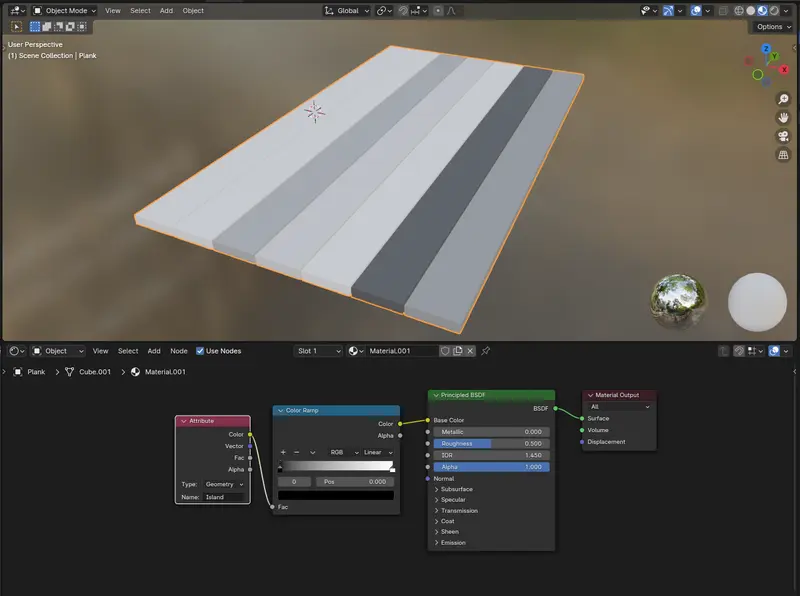
As you can see by driving the material through the color ramp - each mesh island is colored a random color from the ramp.
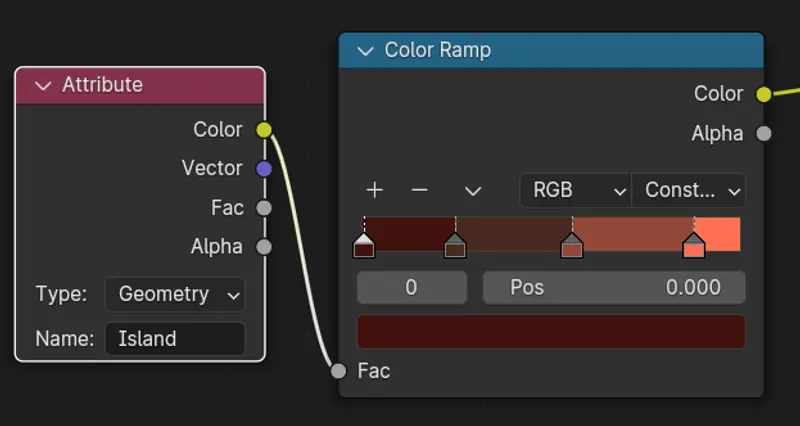
Now to get the colors that you are after you can change the ramp from linear to “constant” and then create more Ramp points with different colors like in the example below.
Where to go for help with Blender geo nodes?
If you find that you are struggling with learning new additional nodes, or just geo nodes in general, there are plenty of places that you can go for assistance.
As already states the blender documentation on the latest blender is a good starting place for research on a problem. However it isn't likely to include specific fixes or examples.
One option that is really great is Stack Exchange.
What is Stack Exchange - And how can you use it with Blender Geo nodes?
Stack exchange is a repository of user answers similar to reddit and quora, that specifically revolves around user generated questions with a focus on the community helping.
Blender stack is the sub group of stack exchange that help out with Blender topics. So if you have a problem you may find your answer on the Blender stack or can ask a question.
The Problem with Geo Nodes.
Now I should probably say that geo nodes are great if you are just starting out, but I am scared as a seasoned Blender user that this push into “All nodes” mentality will come with a cost.
I feel that node trees, while useful and revolutionary, are by their very nature, cumbersome and more work at a certain scale. Nodes begin to turn into spaghetti and debugging becomes a nightmare.
Here is an example fo Unreal Blueprints
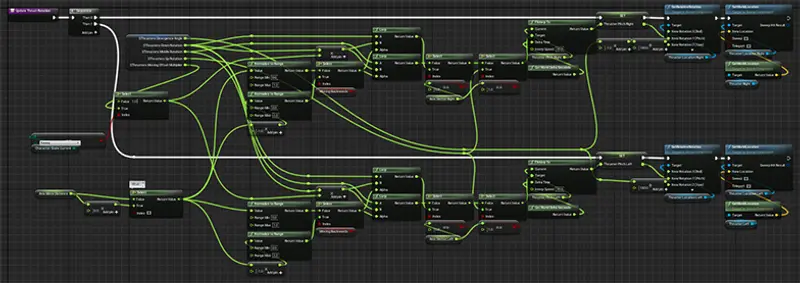
While Geo nodes have yet to see the amount of functionality as Blueprints or Houdini - It is getting there with every blender release.
It is my hope then that with Geo nodes, another look is taken at the Python API, and an analogous code solution is also brought forward. As it would be more easy to read and debug for larger or more ambitious functionality - that bridges the current somewhat clunky API and the entwined nature of Geo Nodes.
I know that many artists may not see eye to eye on this, but trust me. As someone who spent years avoiding coding, I can safely say there is a reason why people tend to bite the bullet. It is just so much better than any no-code or low-code solution in the long term for more complex situations.
Conclusion
That all said, Geo Nodes have revolutionized the way artists and designers work within Blender. With their node-based procedural workflow, intricate geometry generation, and versatile applications, they empower users to unleash their creativity like never before.
As you delve into the world of Geo Nodes, be prepared to experiment, learn, and discover endless possibilities for your 3D projects.